Download and Install
Mx. Voice is free, open-source software available for macOS, Windows, and Linux.
Download the latest version:
- macOS (DMG) — Universal binary for Intel and Apple Silicon
- Windows (EXE) — 64-bit installer
- Linux — AppImage and .deb packages available on GitHub
Once downloaded, install the app the same way you would any other application on your platform. On macOS, open the DMG and drag Mx. Voice to your Applications folder. On Windows, run the installer and follow the prompts.
Choose or Create a Profile
When you first launch Mx. Voice, you’ll see the Profile Launcher. Profiles let you maintain completely separate configurations — different hotkey setups, holding tank lists, and preferences for different shows, venues, or performers.
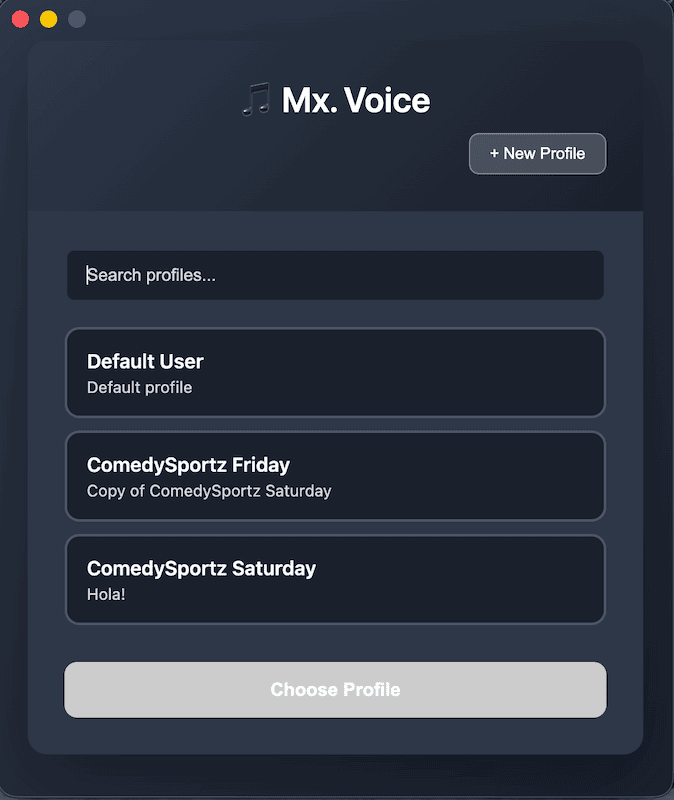
On your very first launch, a Default User profile is created automatically. You can use it right away, or create a new one:
- Click the + New Profile button in the launcher header.
- Enter a Profile Name (letters, numbers, spaces, hyphens, and underscores are allowed).
- Optionally add a Description (e.g., “Saturday night show at Club XYZ”).
- Click Create Profile.
Select your profile and click Choose Profile to launch the main application. You can switch profiles later from the View menu.
Configure Your Preferences
Before importing songs, you’ll want to set up a few directories. Open preferences from View → Preferences in the menu bar.

Data Locations
| Setting | What It Does |
|---|---|
| Audio Files Directory | Where your audio files are stored. When you import songs, files are copied here. Set this before adding any songs. |
| Database File Location | Where the song database lives. The default location works well for most users. |
| Hotkeys / Holding Tank Directory | Where saved hotkey and holding tank configuration files are kept. |
Other Settings
- Fade (seconds) — How long audio takes to fade out when you stop playback. Default is 3 seconds.
- Screen Mode — Choose between Light, Dark, or Auto (follows your system setting).
- Prerelease Updates — Toggle whether you receive beta versions or only stable releases.
- Debug Logging — Enable detailed logging for troubleshooting. You can export logs from the Help menu if you need to report an issue.
Create Categories
Categories help you organize your audio library. Each category has a short code (up to 4 letters) and a description. For example:
| Code | Description |
|---|---|
| COMM | Comedy |
| MUSC | Music |
| SFX | Sound Effects |
| MONS | Monologues |
You can create categories from the main application interface before or during song import. The category code is auto-generated from the description if you don’t specify one.
Add Your Songs
There are two ways to add songs to Mx. Voice:
Bulk Import (Recommended for First Setup)
The fastest way to populate your library is to import an entire folder of audio files at once.
- Click Bulk Add in the application.
- Choose a directory containing your audio files.
- Select a category for the imported songs.
- Click Add Songs.
Mx. Voice will scan the directory (including subfolders), extract metadata like title, artist, and duration from each file, and copy them into your configured audio directory.
Supported audio formats: MP3, WAV, OGG, FLAC, M4A, MP4, AAC
Add Individual Songs
You can also add songs one at a time, which gives you more control over the title, artist, and category for each file.
Play Your First Song
The main Mx. Voice window is divided into three columns:
| Column | Purpose |
|---|---|
| Left — Holding Tank | A staging area for songs you want quick access to, with storage and playlist modes. |
| Center — Search | Search and browse your entire song library by category, title, artist, or tags. |
| Right — Hotkeys | Assign songs to F1–F12 keys for instant playback during a show. |
To play a song:
- Use the Category dropdown and/or the search field in the center column to find a song.
- Click a song in the results to select it.
- Click the Play button in the playback controls at the bottom of the window.
You’ll see a waveform visualization and playback progress. Use the controls to pause, stop, adjust volume, or fade out.
Next Steps
Now that you’re up and running, here are some features to explore:
- Hotkeys — Drag songs from search results onto the hotkey buttons in the right column. Assign them to F1–F12 for instant playback during shows. You get 5 tabs of hotkey sets to work with.
- Holding Tank — Drag songs to the left column for quick access. Switch to Playlist mode and enable Autoplay to play through songs sequentially.
- Import / Export — Save and load your hotkey setups (.mrv files) and holding tank lists (.hld files) so you can prepare in advance and share configurations between profiles.
- Advanced Search — Toggle advanced search to filter by artist, additional info, or date added.
Need help? Visit the GitHub Issues page to report bugs or request features.